Bulk Update
Instead of editing every SKU one by one, you can prefer the “Bulk Update” option. If the template contains an error, it will be indicated in the file.
Request Template
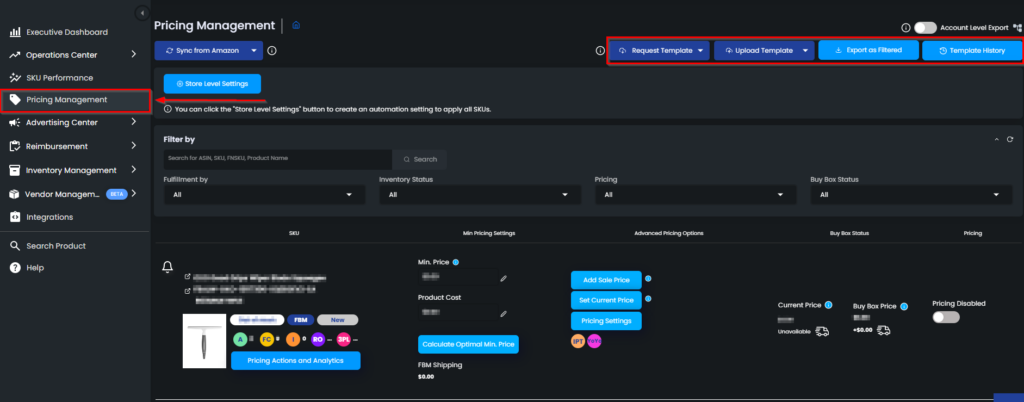
To do so, you can go to the “Pricing Management” page. On the upper right side, there are four buttons; “Request Template“, “Upload Template“, “Export as Filtered”, and “Template History“. See Figure 1.
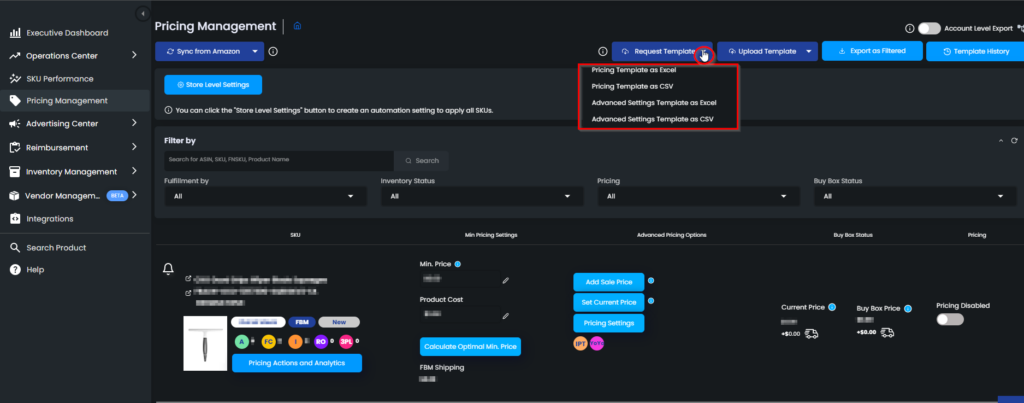
To create a template for your store, hover on the “Request Template” button. There, you will see four template options which are “Pricing Template as Excel“, “Pricing Template as CSV“, “Advanced Settings Template as Excel” and “Advanced Settings Template as CSV“. See Figure 2.
Please note that for your stores that have SKU numbers higher than 50K you need to proceed bulk update process by “Pricing Template as CSV” and “Advanced Settings Template as CSV“. On the other hand, the “Pricing Template as Excel” and “Advanced Settings Template as Excel” options are only valid for stores that have SKU numbers less than 50K.
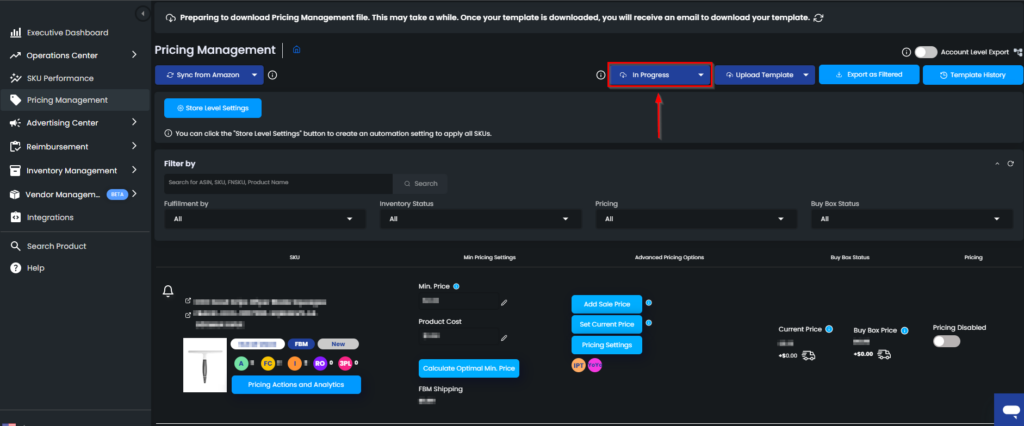
To request a template, first, click on the one that you prefer. Second, it will be ready after some time depending on your SKU count. Meanwhile, you will see “In Progress” while your template is getting ready. See Figure 3.
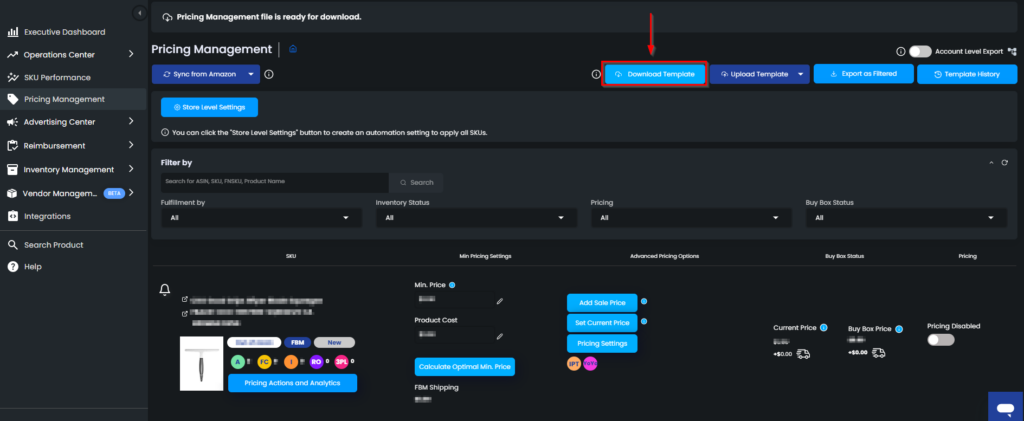
Once the request is completed, the button will turn into the “Download Template” button. To download the created template for your store, click on the button. See Figure 4.
The template has three sheets which respectively are “HELP“, “Example“, and “Bulk Update“. See Figure 5 below.
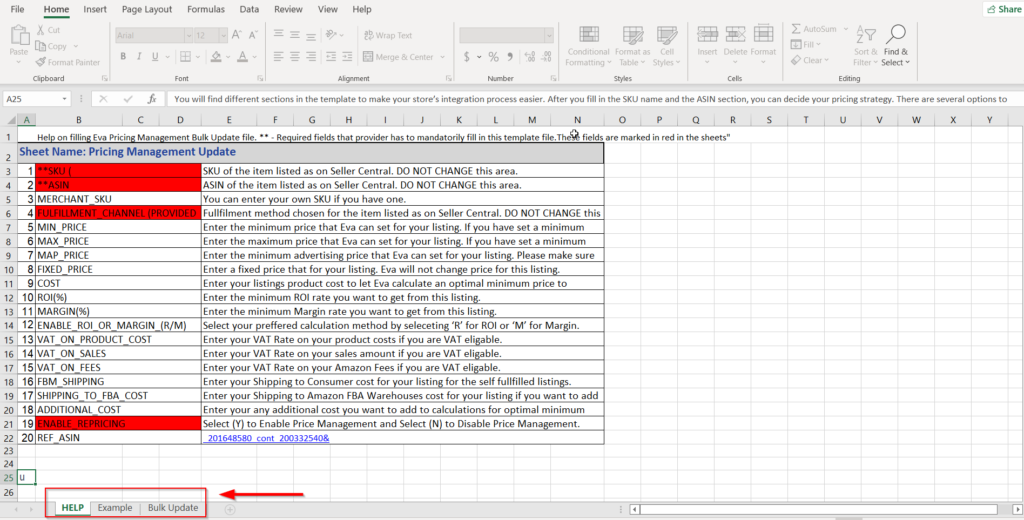
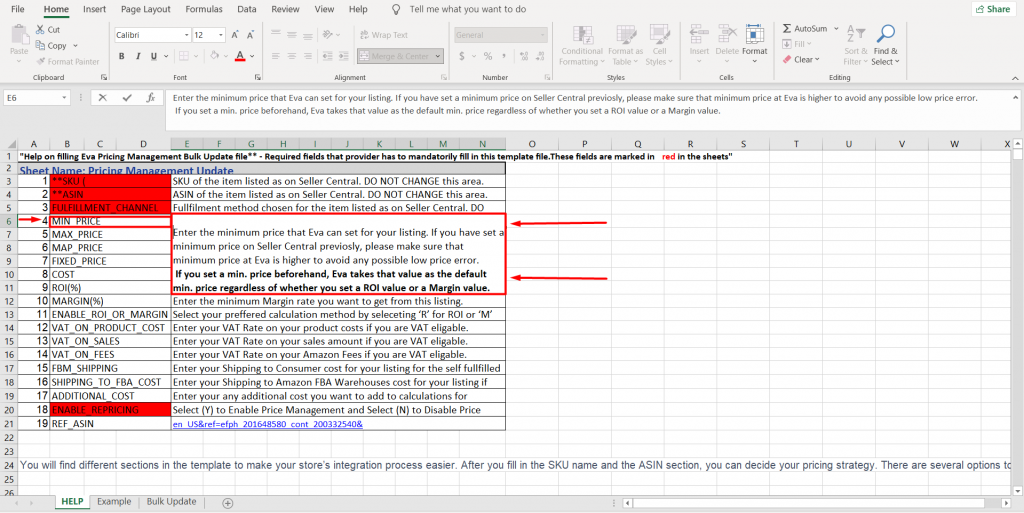
On the “Help” sheet, you can find the explanation of the columns on the “Bulk Update” sheet. If you are not sure what kind of information you should enter into a column, you can consult this sheet. To see the detailed explanation, go and double-click on the related column. See Figure 6 below.
On the “Example” sheet, you can see an illustration of a filled-up template. See Figure 6 below.
The “Bulk Update” sheet is the one you should make changes to. “SKU“, “ASIN”, “PRODUCT TITLE“, and “FULFILMENT CHANNEL” fields are automatically filled in. Fill in the other required fields as explained on the “HELP” sheet and save the changes.
Export as Filtered
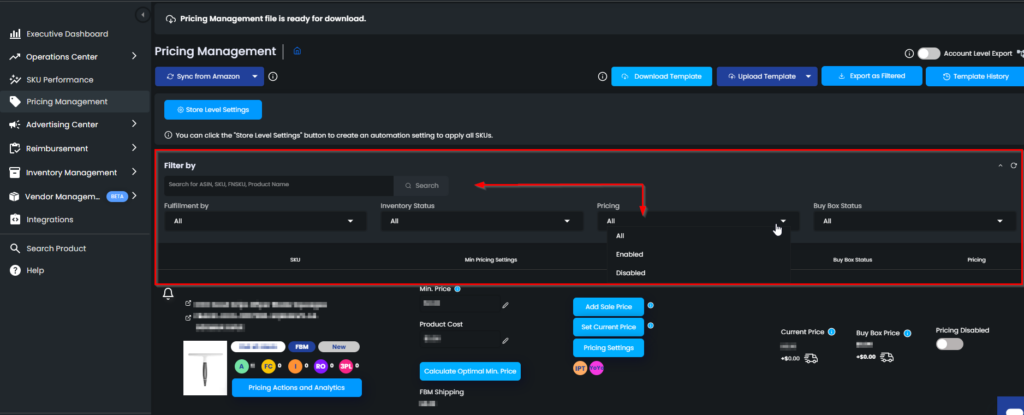
You can export a CSV file that provides detailed information for each SKU such as “Current Price“, “Buy Box Price“, “Quantity Available“, “Quantity Inbound”, and many more. You can filter the SKUs that you want to be in this CSV file. First, go to the “Filter by” section, and second, choose the filter options you need. See Figure 9 below.
To do so, first, go to the “Filter by” section, and second, choose the filter options you need. See Figure 9 below.
After choosing the filters, go and click on the “Export as Filtered” button on the upper right side. Please see Figure 10 below.
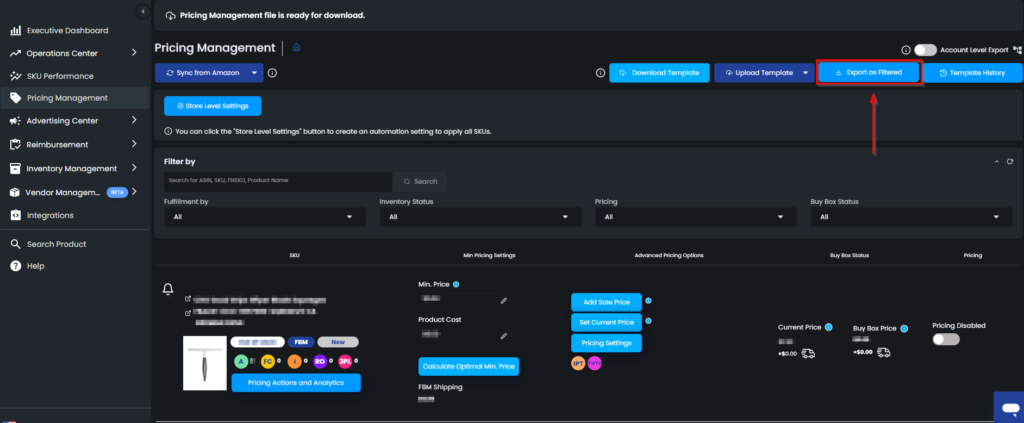
The CSV will be downloaded to your computer with the information of the SKUs you filtered.
Moreover, you can bulk update the filtered SKUs by the settings below:
- Minimum Price
- Maximum Price
- MAP Price
- Fixed Price
- Cost
- ROI(%)
- Margin(%)
- Enable ROI or Margin
- VAT on Product Cost
- VAT on Sales
- FBM Shipping
- Shipping to FBA Cost
- Additional Cost
- FBA Fee
- Enable Repricing
You may check the Upload Template section below for more detailed information about the bulk update process. Please be aware that you should select the “Pricing Template as CSV” option to upload the “Export as a Filtered” file.
Upload Template
To proceed with the bulk update option, you have to upload the template on which you made changes. To do so, hover on the “Upload Template” button. There, you will see four template options which are “Pricing Template as Excel“, “Pricing Template as CSV“, “Advanced Settings Template as Excel” and “Advanced Settings Template as CSV“, please proceed by selecting the appropriate option. See Figure 7.
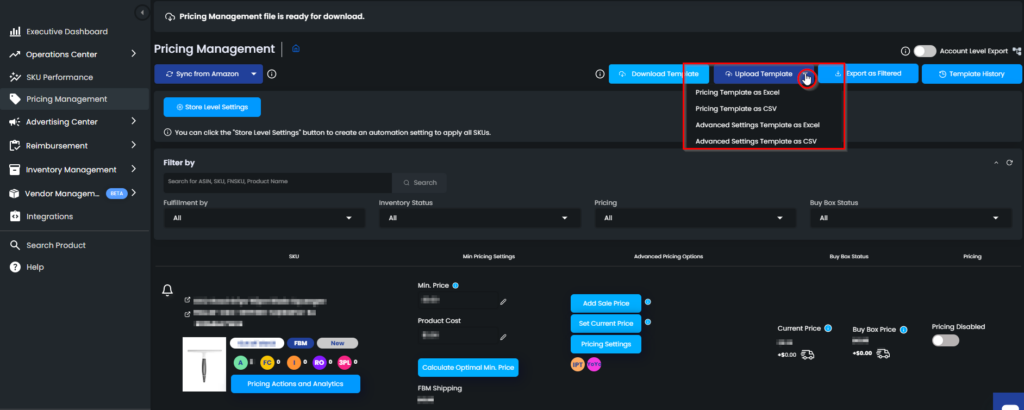
Once you selected the appropriate template, a pop-up screen will appear. Drag or browse your file here. The process takes a while depending on the number of your listings. Please see Figure 7 below.
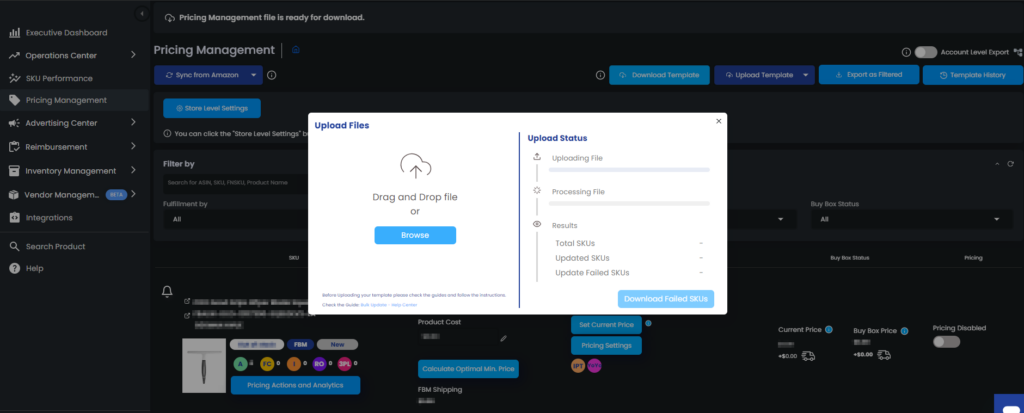
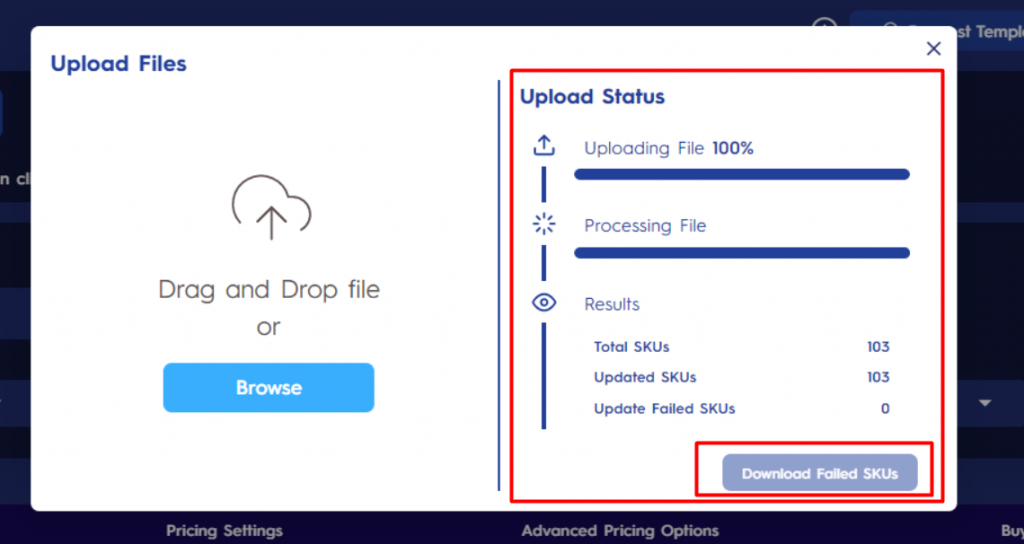
The upload status is shown on the right side of the pop-up screen. If there are any failed SKUs, you can download these SKUs by clicking on the “Download Failed SKUs” button and after making the necessary changes, upload them again by following the same steps. See Figure 8 below.
Pricing Template as Excel & CSV
“Pricing Template” is the template for the general information of your SKU. This template includes the settings below;
- Minimum Price
- Maximum Price
- MAP Price
- Fixed Price
- Cost
- ROI(%)
- Margin(%)
- Enable ROI or Margin
- VAT on Product Cost
- VAT on Sales
- FBM Shipping
- Shipping to FBA Cost
- Additional Cost
- FBA Fee
- Enable Repricing
Advanced Settings Template Excel & CSV
“Advanced Settings Template” is the template that involves the settings on the “Advanced Pricing Settings“. This template includes the settings below.
- Enable Buybox Sharing
- Minimum Buybox Ownership(%)
- Enable Fulfillment Channel Competition
- Inventory Protection Days
- SKU or Store Level for Inventory Protection Days
- Enable Price Rounding
- SKU or Store Level for Price Rounding
- Price Rounding First Digit
- Price Rounding Last Digit
- Enable Target Velocity
- Target Velocity Initial Price
- Target Velocity Unit Target
- Target Velocity Unit Interval
- Target Velocity Increase (%)
- Enable YoYo
- SKU or Store Level for YoYo
- YoYo Increase By
- YoYo Increase Value
- YoYo Trigger Hour Interval
- YoYo Wait Minute Interval
- Enable Brand Competition Strategy
- SKU or Store Level for Brand Competition Strategy
- Enable Competitor Pricing Threshold
- SKU or Store Level for Competitor Pricing Threshold
- Enable Scheduled Pricing
- Increase or Decrease for Min Price
- The Threshold for Min Price Increase
- The Threshold for Min Price Decrease
- Rate of Min Price
- Unit Threshold for Scheduled Pricing
- Time Interval to Check
- Enable Amazon Competition
- SKU or Store Level for Amazon Competition
- Amazon Competition Increase By
- Amazon Competition Type
- Amazon Competition Value
Important Note: Due to some Excel limitations and settings, when you download an Advanced Settings Template, you may encounter this error shown below screenshot when opening the file, if so please click “Yes” and continue, the file will be working smoothly.

Template History
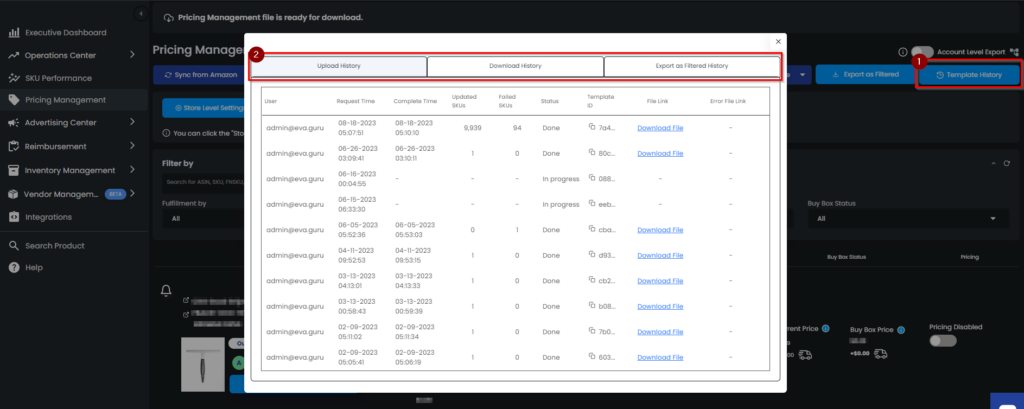
This area is for you to display the template history in 3 sections; “Upload History”, “Downloaded History” and “Export as Filtered History”. To do so, click on “Template History”, and a pop-up screen will appear. Please see Figure 9 below.
Upload History
To check your uploaded template history, click on the first section “Upload History” from the pop-up screen. You can display the details as User, Request Time, Complete Time, Uploaded SKUs, Failed SKUs, Status, and Templated ID. Please see Figure 10 below.

Download History
This area for you to display the downloaded template history. You can click on “Download Report” to download the past template. Please see Figure 11 below.

Export as Filtered History
This area for you to display the Export as Filtered History. You can click on “Download Report” to download the past template. Please see Figure 12 below.

