Release Note 26 Nov, 2021
Eva is now available in Amazon Indian Marketplace! You can follow the link to see how you connect your stores in Indian market.
NEW FEATURES
Rounding Price Feature
Eva has another very handy feature for the brands and private labels now! It is possible to round the remainder of the prices.
1. To use the feature, go to the “Pricing Management” page. Find the related SKU for which you want to round the remainder.
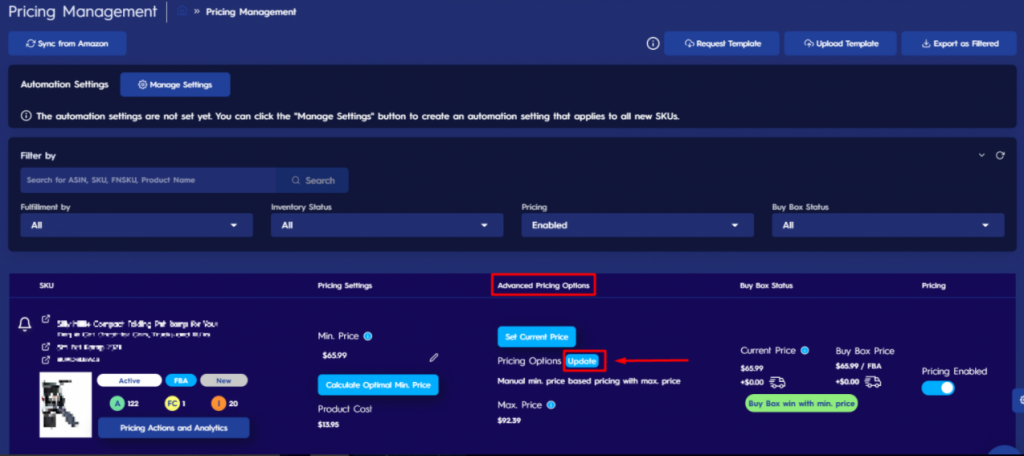
2. Click on the “Update” button under the “Advanced Pricing Options“. Please see Figure 1 below.
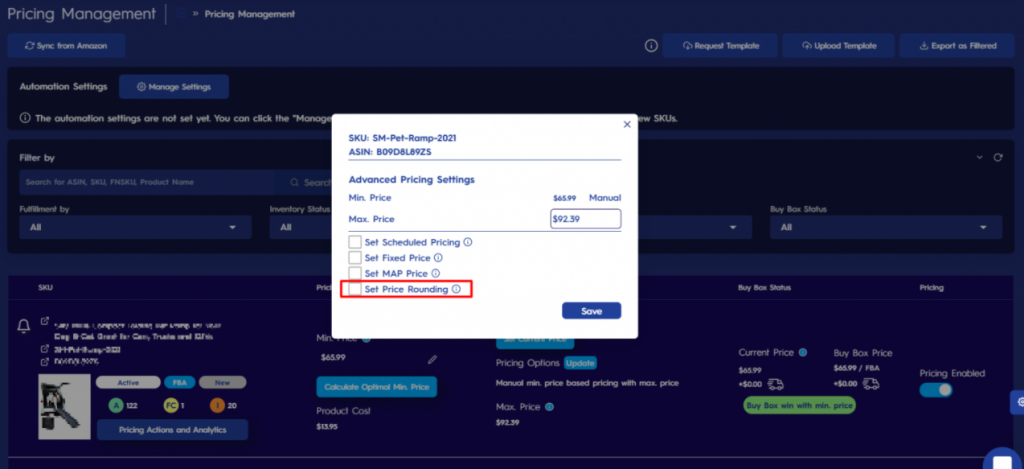
3. A pop-up screen will appear. On this screen go and check the “Set Price Rounding” box. Please see Figure 2 below.
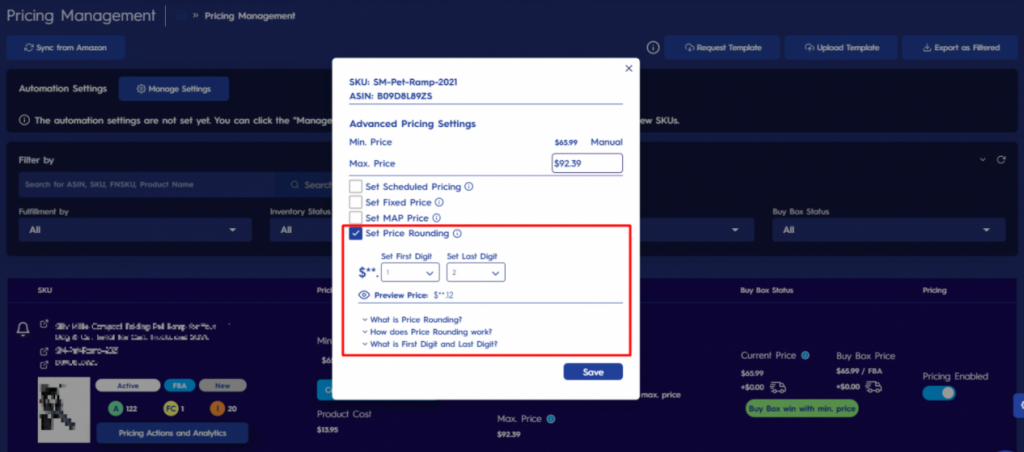
4. Once you check the box, a new section will open on the pop-up screen. There are two options; you can either “round two digits” of the remainder or “round the last digit” of the remainder. Please see Figure 3 below.
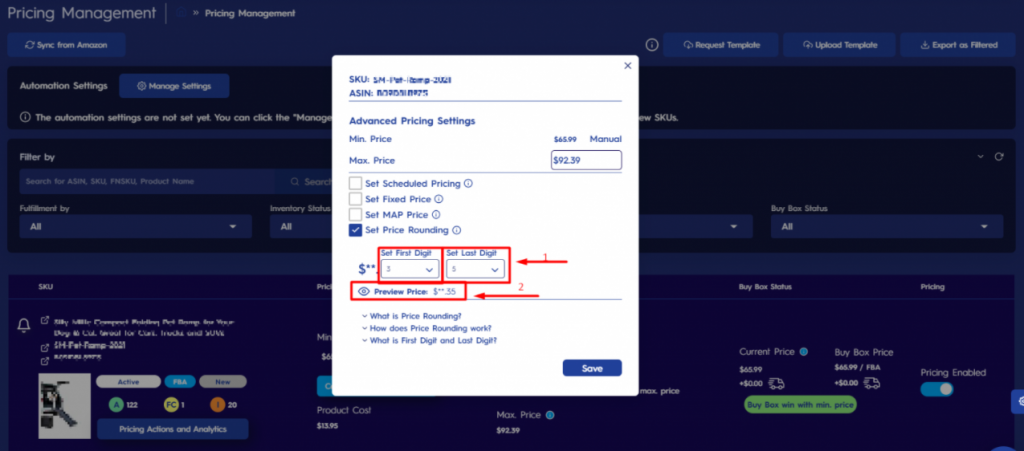
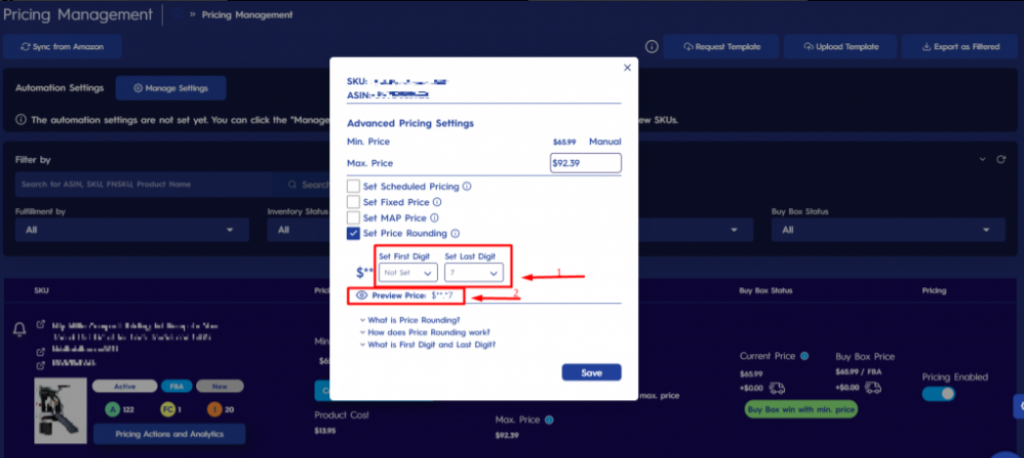
5. If you choose to “round two digits“, the remainder of each dynamic price will be the value you set. To do so, go and enter the value or choose it from the dropdown menu for both “Set First Digit” and “Set Last Digit” fields. Please see arrow 1 in Figure 4 below. Once you enter the values, you can preview the price below. Please see arrow 2 in Figure 4 below.
6. If you choose to “round only the last digit“, do not set any value for the “First Digit” or choose “Not Set” option from the dropdown menu for the “First Digit“. Enter a value only for “Last Digit“. Please see arrow 1 in Figure 5 below. Once you enter the values, you can preview the price below. Please see arrow 2 in Figure 5 below.
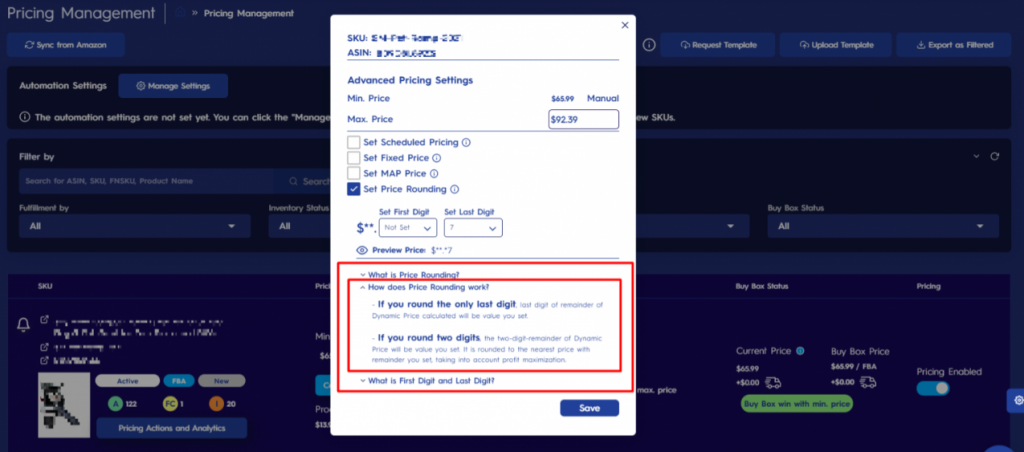
7. Down below, you can find an explanation to learn how this feature works. To check the explanation, go and click on the questions. Please see Figure 6 below.
Returns Management
Eva has a brand new page enabling you to track removal order easily.
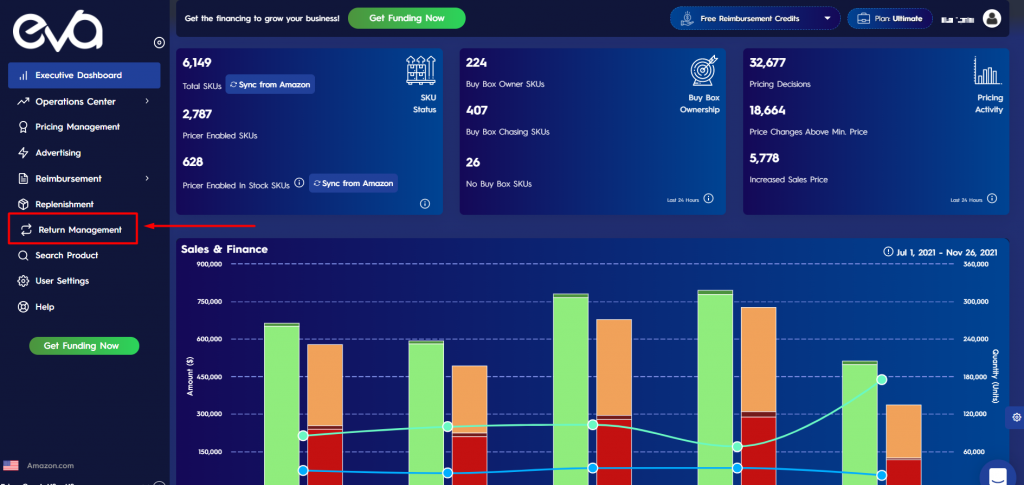
1. To use the returns management service, go and click on “Returns Management” page on Eva control panel. Please see Figure 7 below.
2. On this page, you can easily track and filter the “Removal Orders“.
The page opens with the list of removal orders in the “last day (yesterday)” by default.
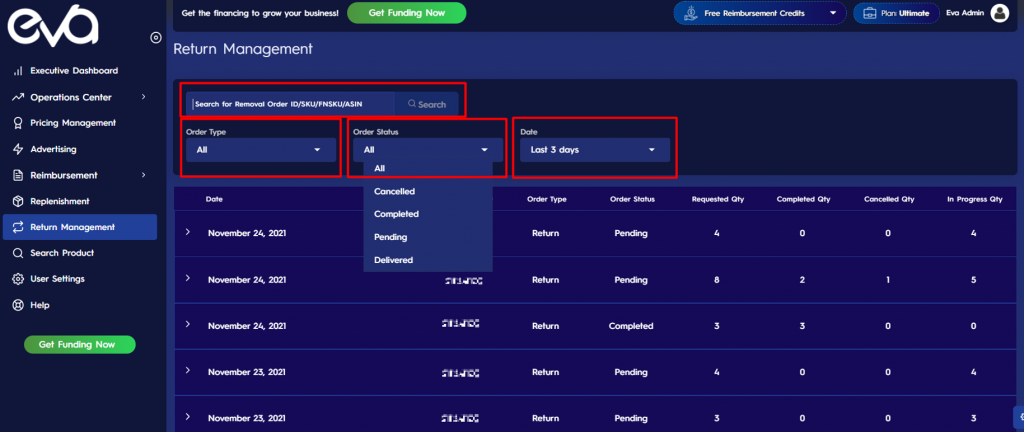
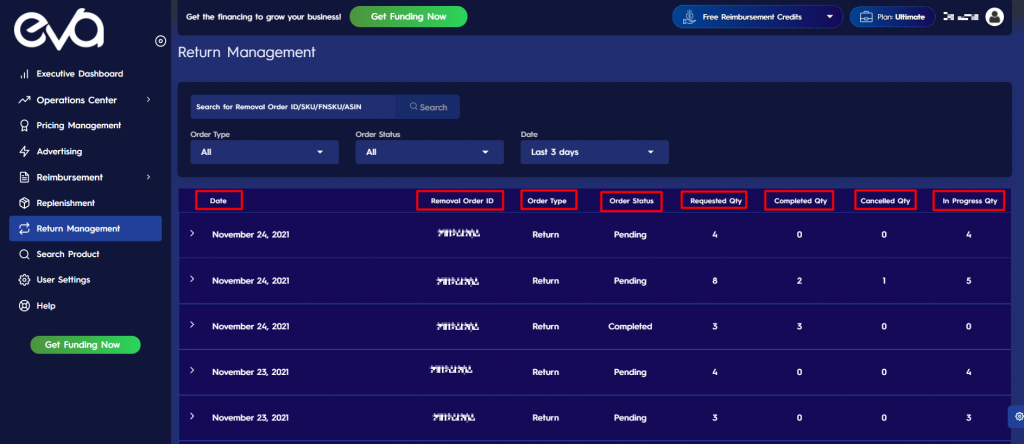
3. You can filter the removal orders by “Order Type“, “Order Status” and “Date” dropdown menus. Additionaly you can search “Removal order ID/SKU/FNSKU/ASIN” with the search box. Please see Figure 8 below.
4. After applying the filters, all the removal orders will be displayed below with the detailed information which respectivaly are “Date“, “Removal Order ID“, “Order Type“, “Order Status“, “Requested Quantity“, “Completed Quantity“, “Canceled Quantity” an “In Progress Quantity“. Please see Figure 9 below.
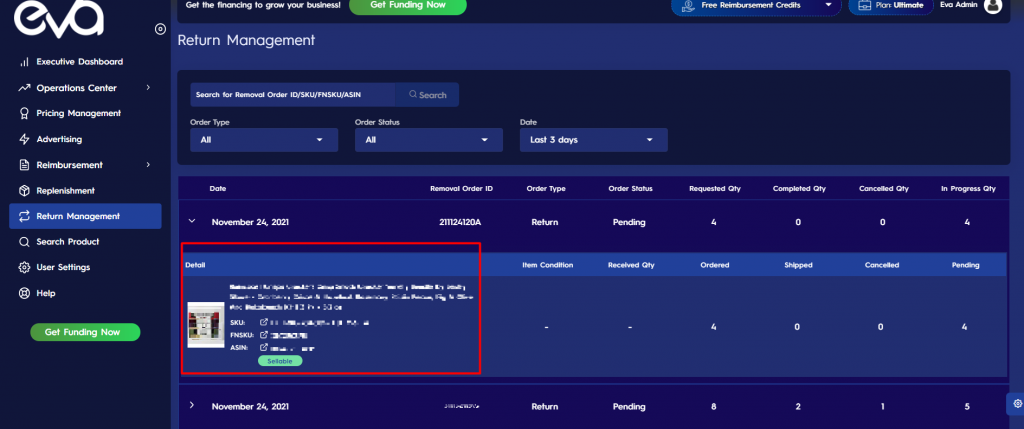
5. You can see the details of each removal order by simply clicking on the cursor. A new section will appear where you can see the “name” “SKU”, “FNSKU” and “ASIN” and “condition” of the items in that removal order. Please see Figure 10 below.
IMPROVEMENTS
New Bulk Update Template
We have two templates now! With the new template for the bulk update option for “Pricing“, you can handle bulk update more easily because we added “help” sheet and “example” sheet to the template. With “Advanced Settings” you can manage advanced pricing options easily. Additionally, now you can track whether the template is uploaded successfully or not, and whether all the SKUs are updated successfully or not.
1. Request Template:
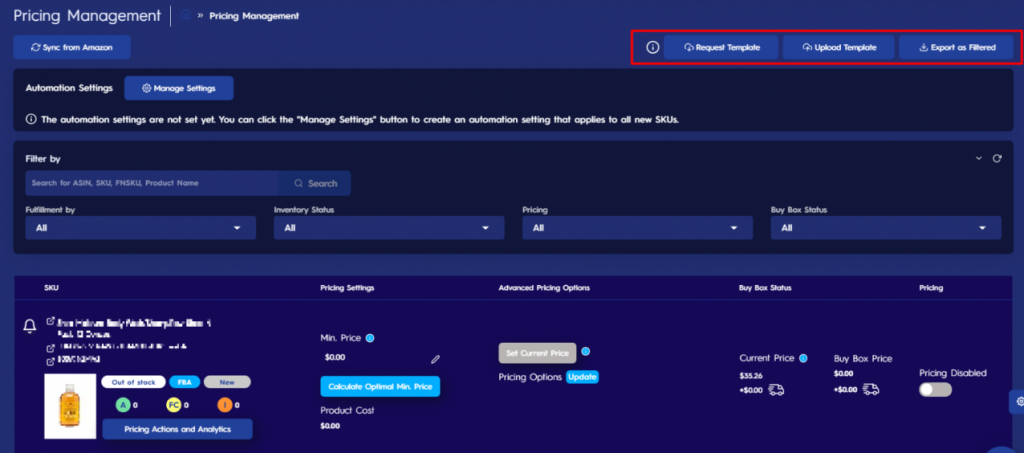
To do so, go to the “Pricing Management” page. On the upper right side, there are three buttons which respectively are “Request Template“, “Upload Template” and “Export as Filtered“. Please see Figure 11 below.
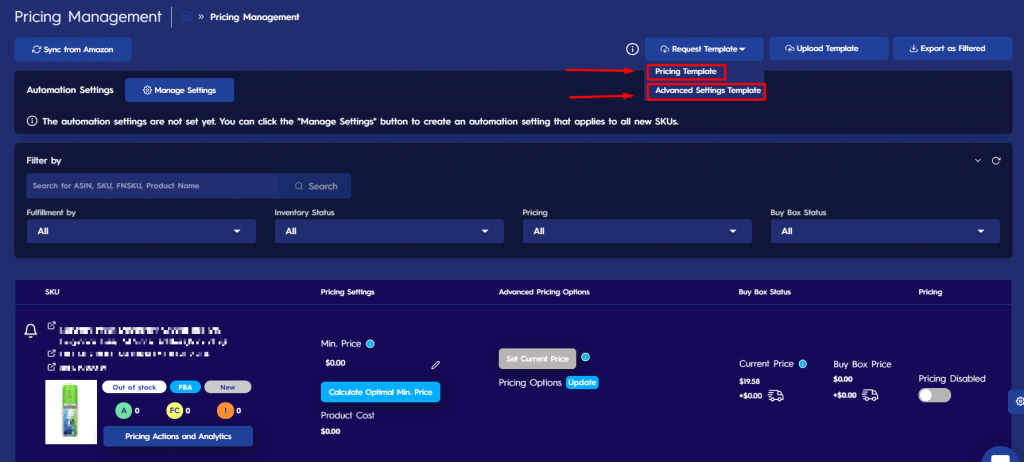
1. There are two types of templates which are “Pricing” and “Advanced Settings“. To create one of these templates for your store, click on the “Request Template” button. Request the one you need by clicking on the related button on the dropdown menu. Please see Figure 12 below.
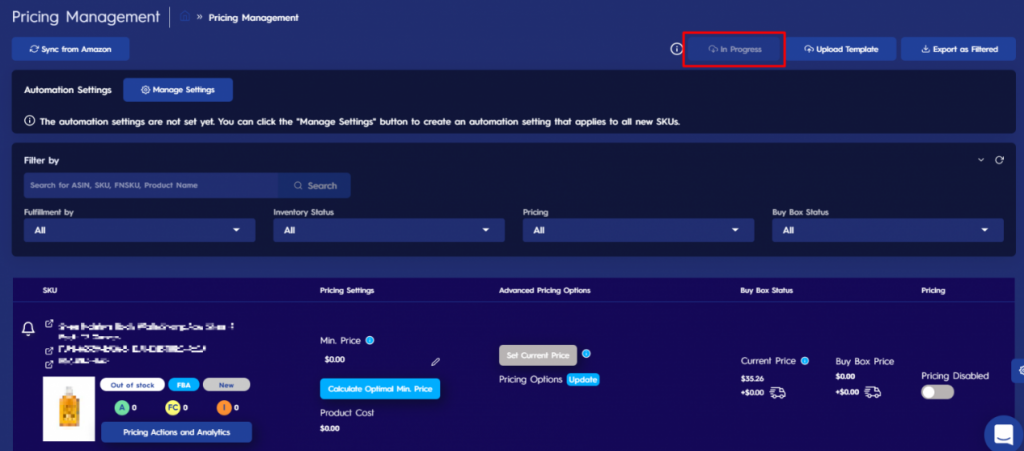
2. Once your request is put in process, the button will show “In Progress” untill the request is completed. Please see Figure 13 below.
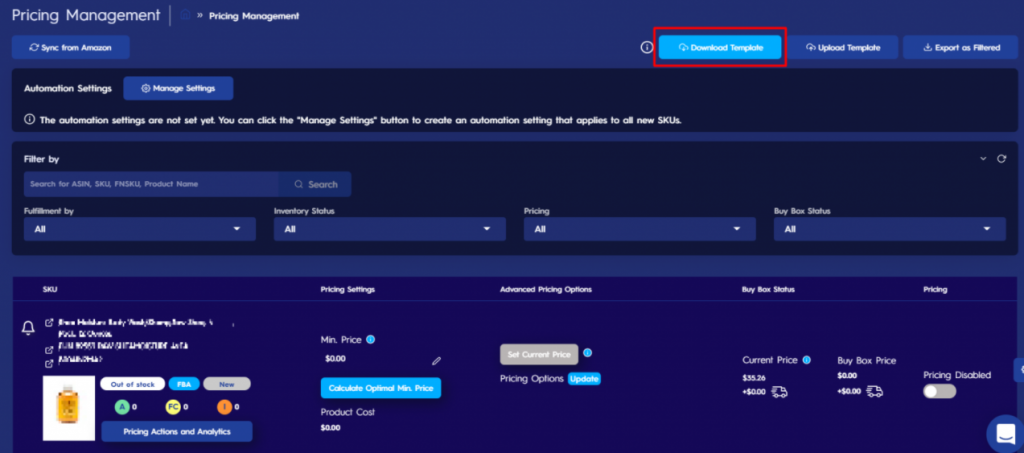
3. Once the request is completed, the button will turn into “Download Template” button. To download the created template for your store, click on the button. Please see Figure 14 below.
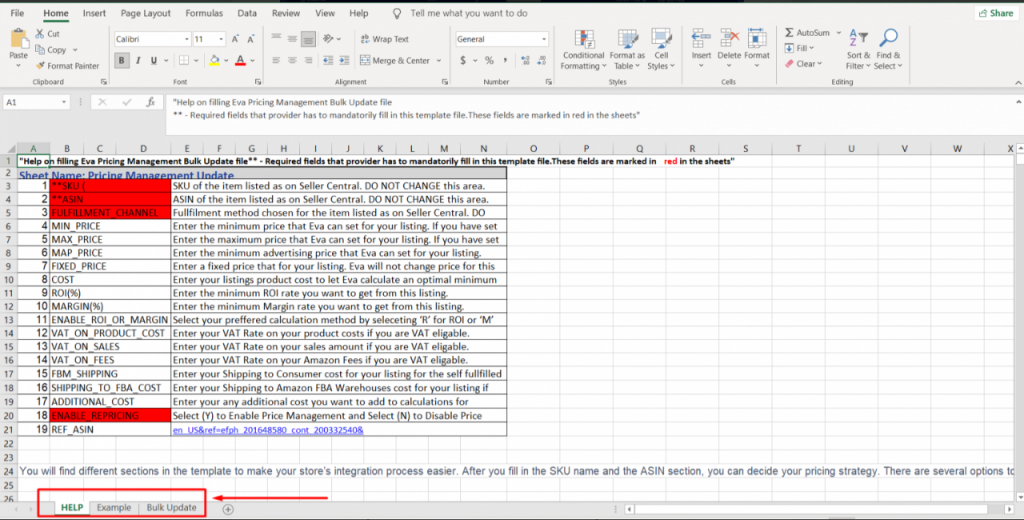
4. “Pricing template” has three sheets which respectively are “HELP“, “Example”, and “Bulk Update“. Please see Figure 15 below.
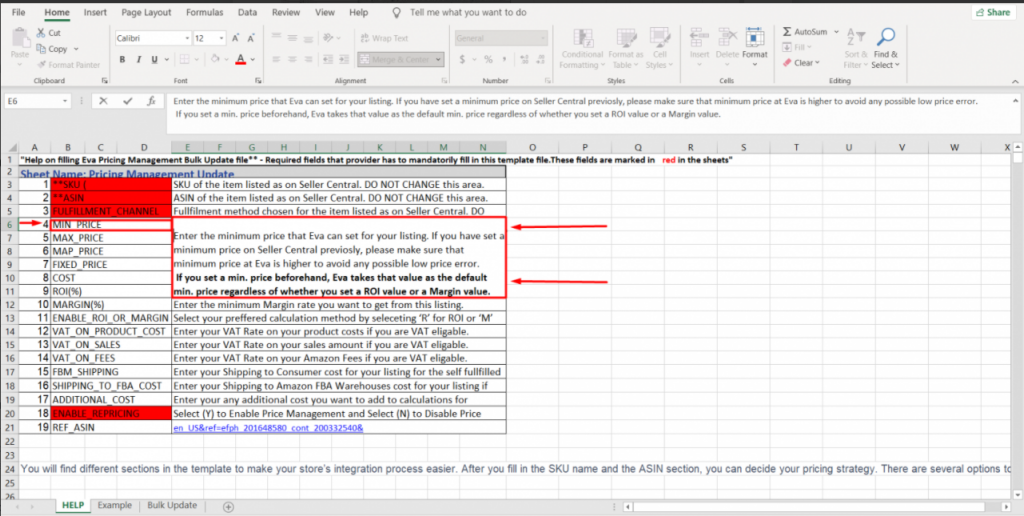
5. On the “Help” sheet, you can find the explanation of the columns on the “Bulk Update” sheet. If you are not sure what kind of information you should enter into a column, you can consult this sheet. To see the detailed explanation, go and double-click on the related column. Please see Figure 16 below.
6. On the “Example” sheet, you can see an illustration of a filled-up template.
“Bulk Update” sheet is the one on which you need to make changes. “SKU”, “ASIN” and “FULFILLMENT CHANNEL” fields are automatically filled in. Fill in the other required fields as explained on the “HELP” sheet and save the changes.
2. Upload Template
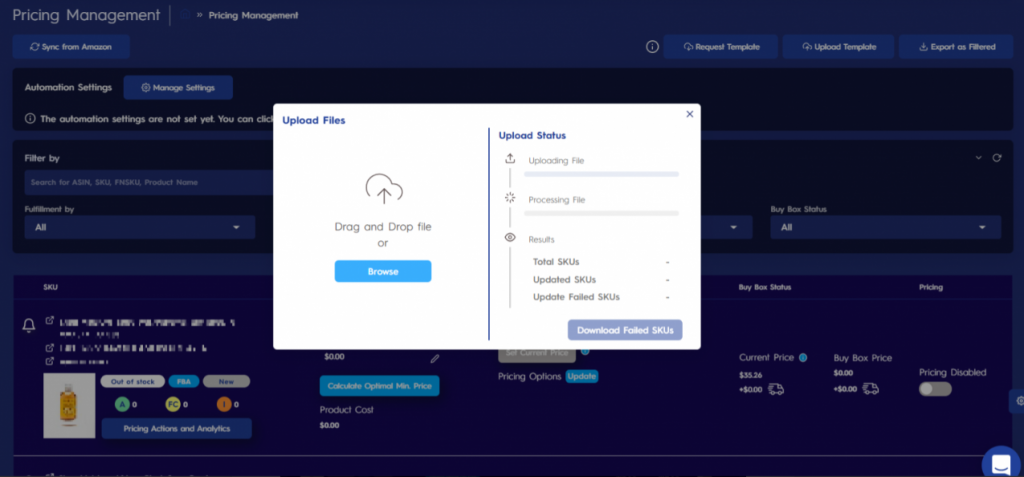
1. To proceed with the bulk update option, you have to upload the template on which you made changes. To do so, click on the “Upload Template” button. A pop-up screen will appear. Drag or browse your file here. The process takes a while depending on the number of your listings. Please see Figure 17 below.
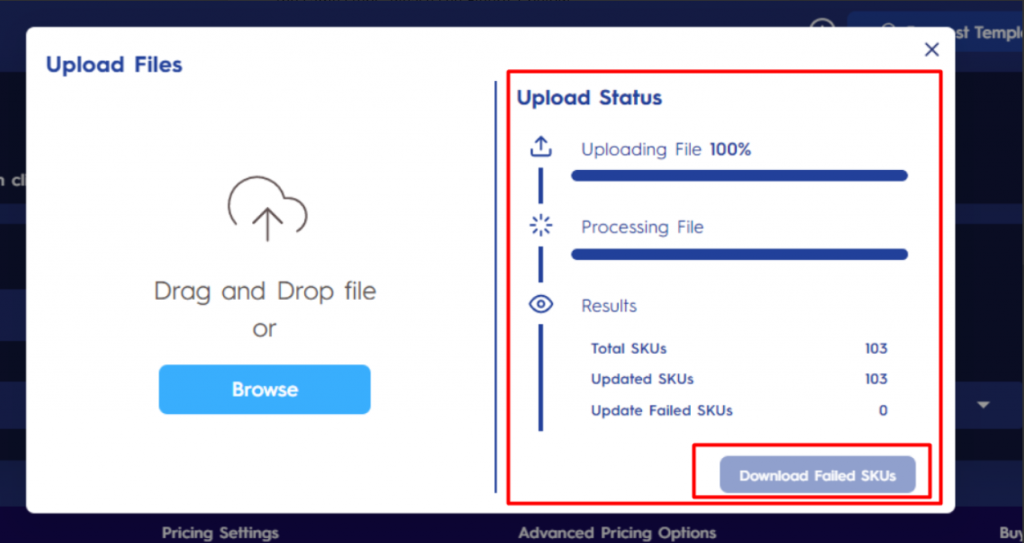
2. The upload status is shown on the right side of the pop-up screen. If there are any failed SKUs, you can download these SKUs by clicking on the “Download Failed SKUs” button and after making the necessary changes, upload them again by following the same steps. Please see Figure 18 below.
ROI Info on Replenishment Page
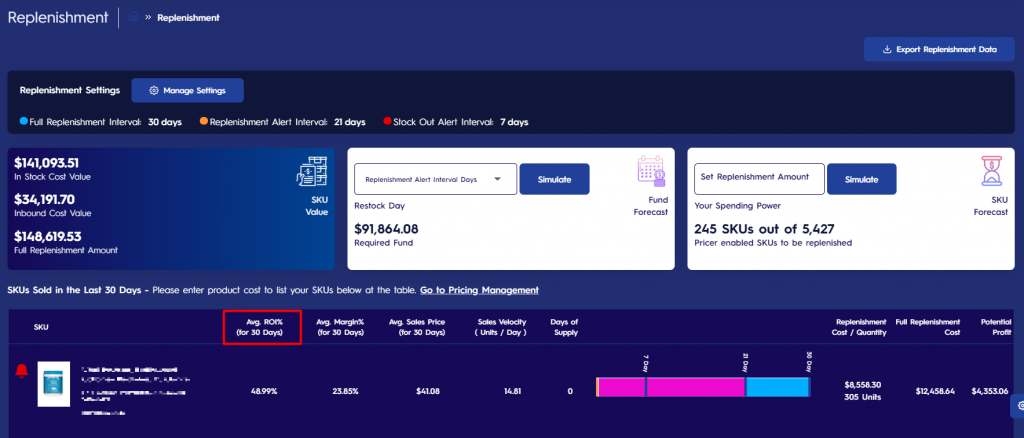
Now you can see ROI information on SKU-level on the “Replenishment Page“.
1. Go to “Replenishment” page.
2. The list of “SKUs sold in the last 30 days” has now another information called as “Avg. ROI% (for 30 days)“. Please see Figure 19 below.
Detailed Daily Sales Information
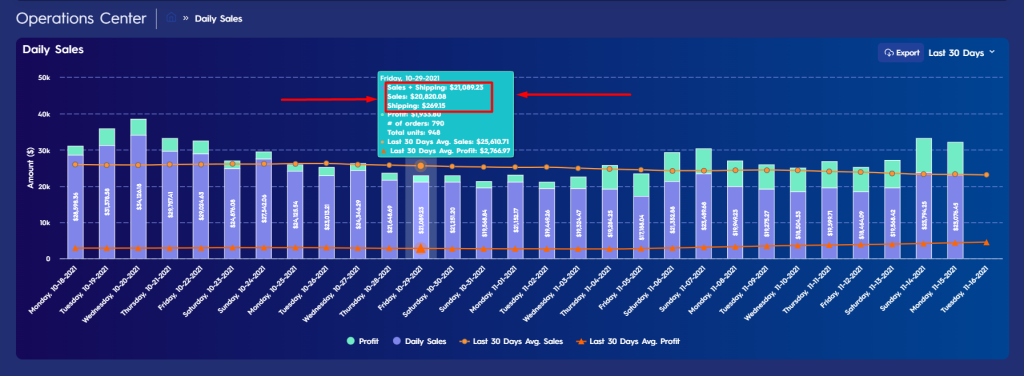
Previously, on daily sales chart, you could see “sales+shipping” amount. Now you can track the “sales” and “shipping” amount separately on daily bases.
1. To do so, go to “Operations Center” and click on “Daily Sales“.
2. Hover over the date of which detailed information you want to see. A pop-up list will appear.
3. On this list, you can now see “shipping” and “sales” information together and separately. Please see Figure 20 below.
Buy Box Sharing Feature
Eva used to run the “buy box sharing” feature automatically if an ASIN is in the “Stockout Alert Interval Days“. However, now you have all the freedom to customize the “Buy Box Sharing” mode on SKU-level and/or on the store level.
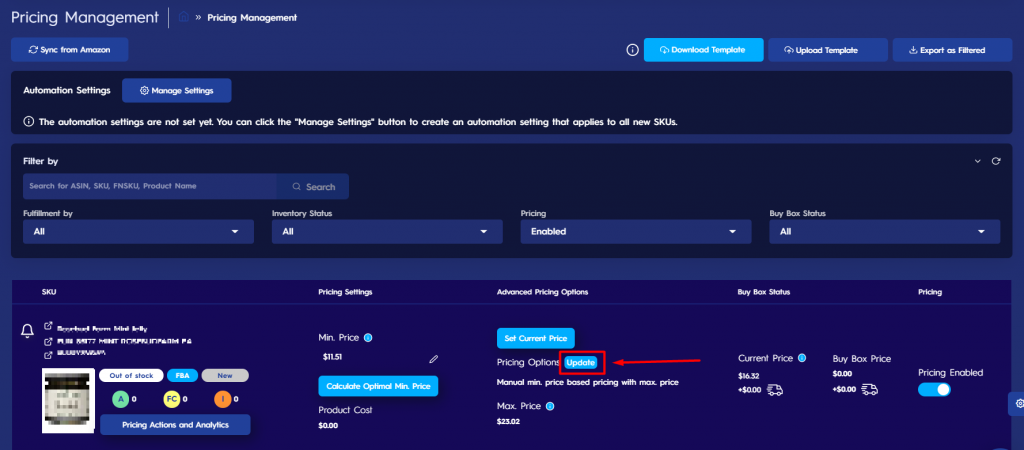
1. To use this feature on the SKU level, go to the “pricing management” page and find the SKU for which you want to enable the “Buy Box Sharing” feature.
2. Click on the “Update” button under “Advanced Pricing Options“. Please see Figure 21 below.
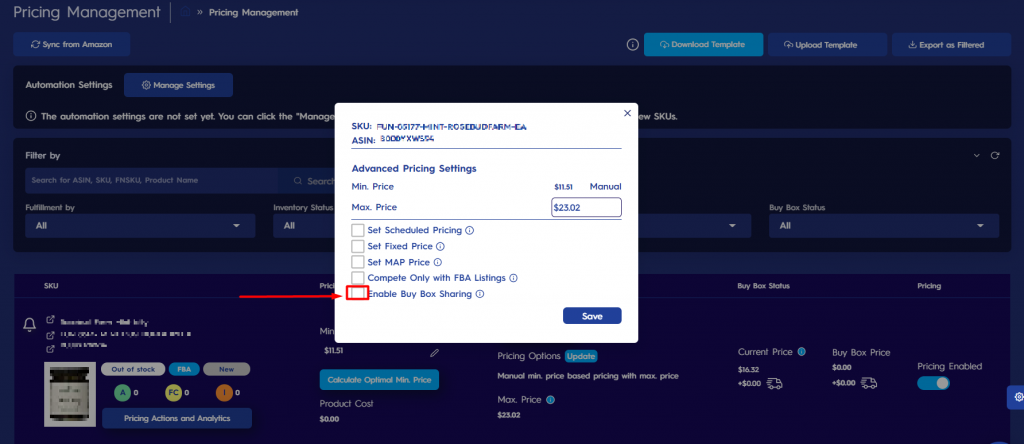
3. A pop-up screen will appear. Go and check the “Enable Buy Box Sharing” box. Please see Figure 22 below.
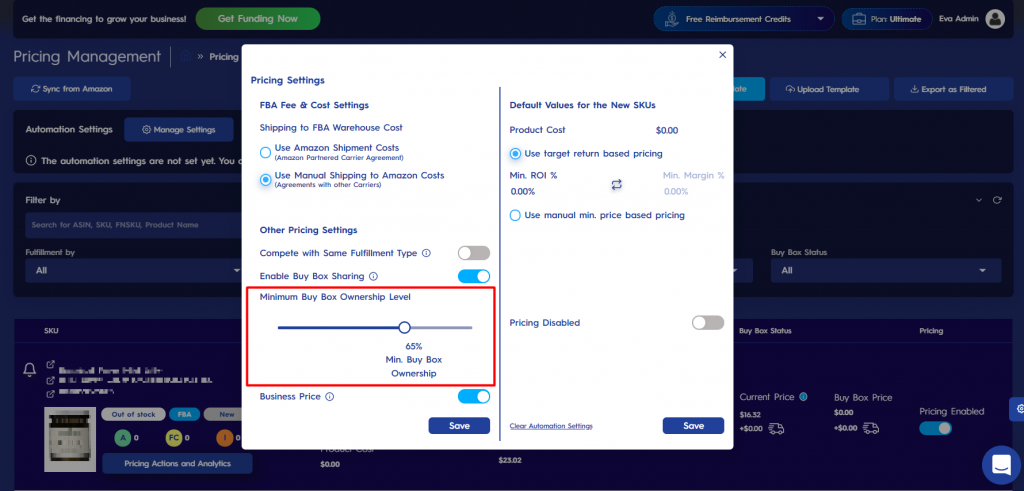
4. A new section will appear on the pop-up screen. Here you can customize the “Min Buy Box Ownership Level” by dragging the button below. Then click “Save“. Please see Figure 23 below.
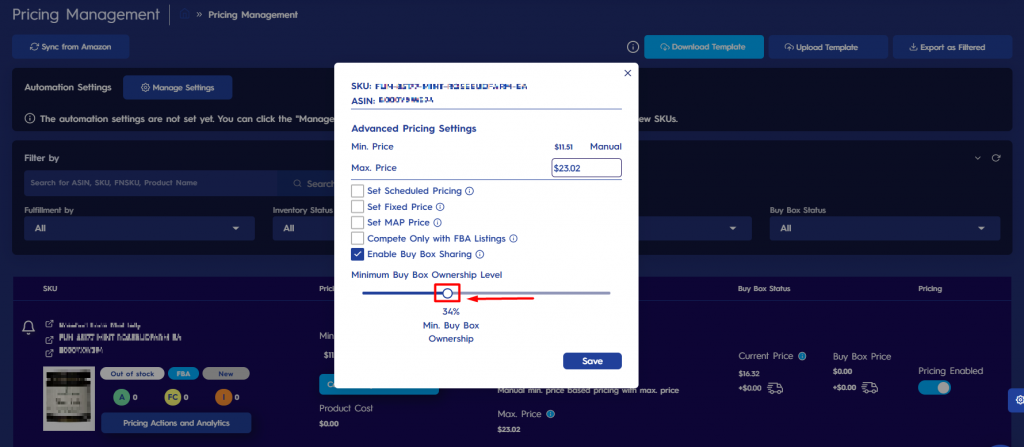
5. The SKU will share the buy box if the “buy box ownership” rate is higher than the “min boy box ownership level” you set. If it is lower, it will not share the buy box.
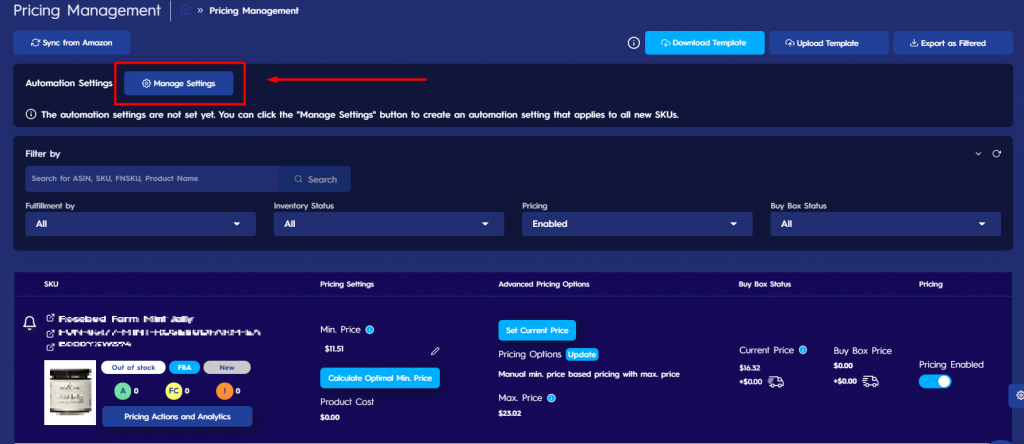
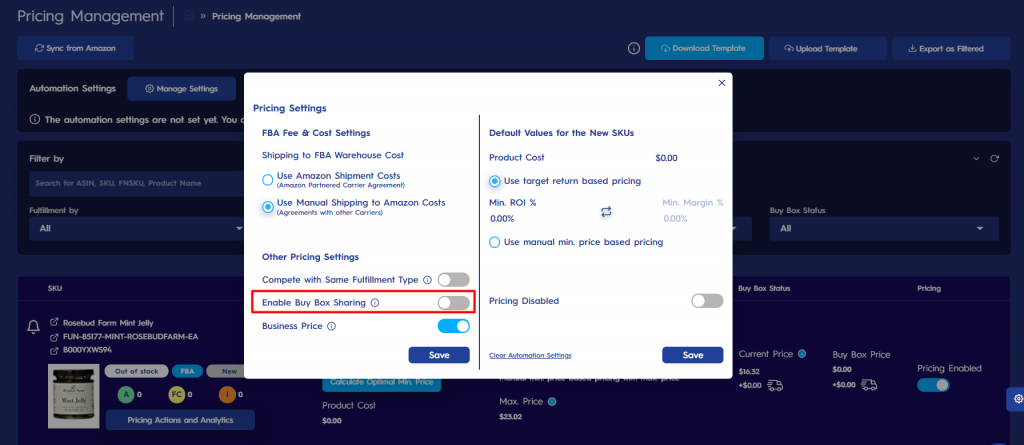
6. You can customize this setting on the store level as well. To do so, click on the “Manage Settings” button. Please see Figure 24 below.
7. A pop-up screen will appear. You can use the “Enable Buy Box Sharing” toggle to enable the feature for all the SKUs in the store. Please see Figure 25 below.
8. A new section will appear on the pop-up screen. Here you can customize the “Min Buy Box Ownership Level” by dragging the button below. Then click “Save“. Please see Figure 26 below.
9. Please note that if you enable the “Buy Box Sharing” feature on the store level and then do “Buy Box Sharing” customizations on the SKU level, the changes that you make on the SKU level will be applied for the related SKUs.
Compete with Same Fulfillment Type
You can now decide your competition strategy. You can choose to compete only with the same fulfillment type sellers on both SKU-level and/or on the store level.
1. To use this feature on the SKU level, go to the “pricing management” page and find the SKU for which you want to enable the “Buy Box Sharing” feature.
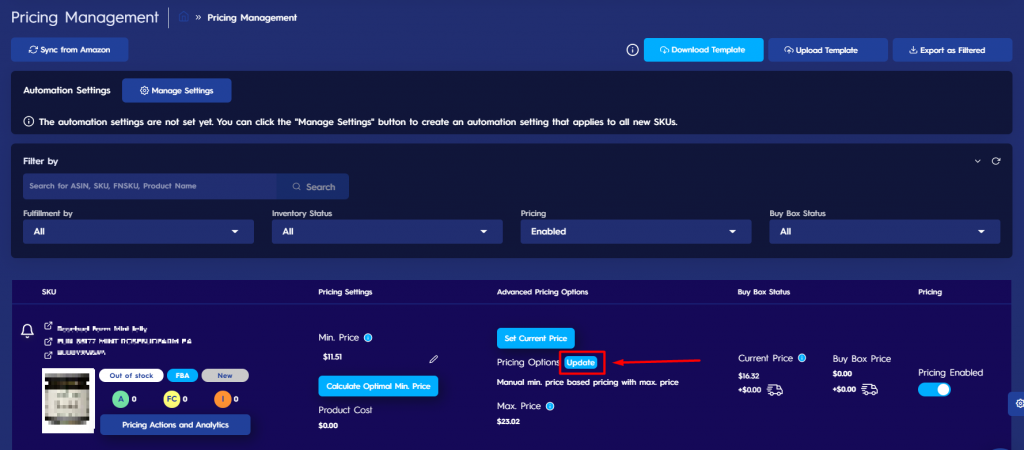
2. Click on the “Update” button under “Advanced Pricing Options“. Please see Figure 27 below.
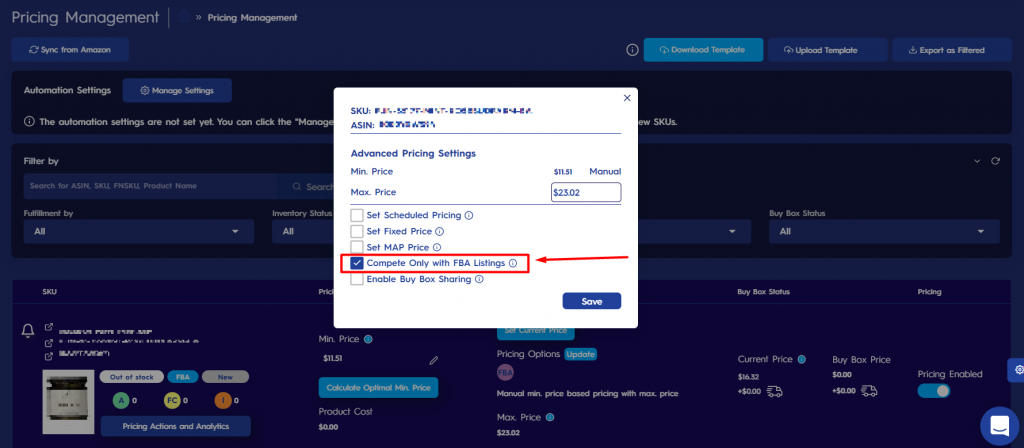
3. A pop-up screen will appear. Go and check the “Compete Only with FBA/FBM Listings” box. Please see Figure 28 below.
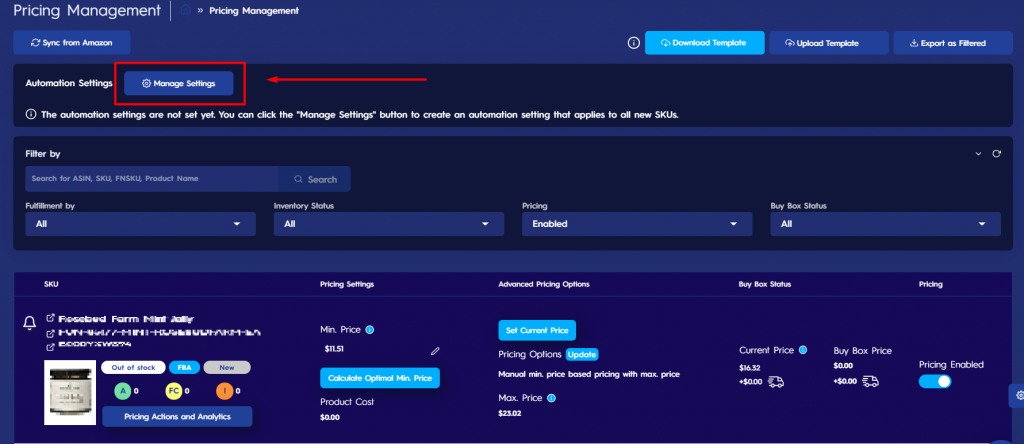
4. You can customize this setting on the store level as well. To do so, click on the “Manage Settings” button. Please see Figure 29 below.
5. A pop-up screen will appear. You can use the “Compete with Same Fulfillment Channel” toggle to enable the feature for all the SKUs in the store. Please see Figure 30 below.
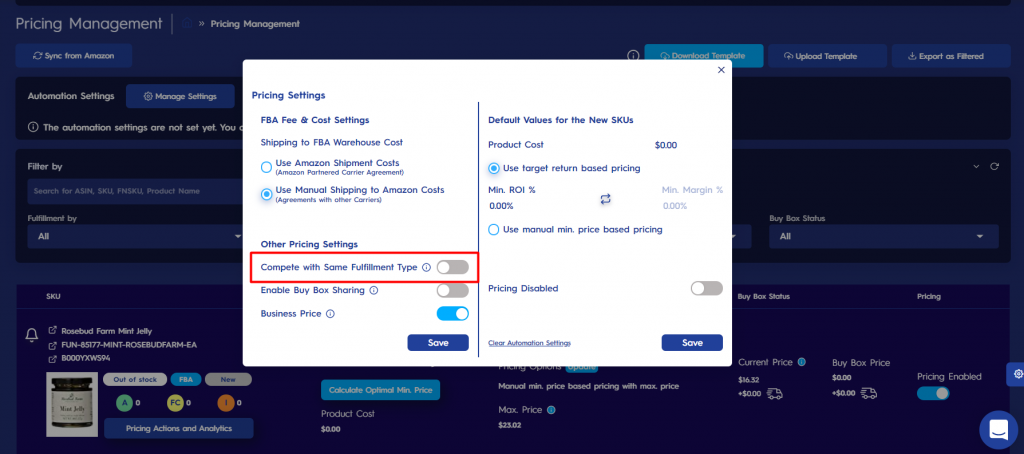
6. Please note that if you enable the “Compete with Same Fulfillment Type” feature on the store level and then disable it for some of the SKUs on the SKU level, for those SKUs the feature will be disabled.
